 |
| Marshmallow_root_access |
After the upgrade to Marshmallow and reverting back to Lollipop then going back to M trial and error steps, I also tried to root my upgraded M 6.0.1 version and finally came up with a solution since my root access was removed after the update.
If you miss out my post on how to install update via adb sideload you may check it out here.
Flashing TWRP via adb
Since I prefer to have a custom recovery.img like TWRP which is quite handy to make a backup ROM that I can easily restore in case I encounter errors in the future so you may as well follow.
Since I prefer to have a custom recovery.img like TWRP which is quite handy to make a backup ROM that I can easily restore in case I encounter errors in the future so you may as well follow.
When you are in Marshmallow version you need to flash TWRP via adb, I had a separate tutorial found here on how to flash or just follow steps below.
***Download TWRP.img (here)
STEPS:
***Download TWRP.img (here)
STEPS:
1. Just save the custom recovery.img(TWRP) under adb platform tools folder and you may opt to rename it to whatever name you want either to shorten the original name like recovery.img , TWRP.img vs the long name twrp-3.0.2-5-Z00L.img
2. Connect your device to PC then just open a command window and type (Shift+right click of mouse)
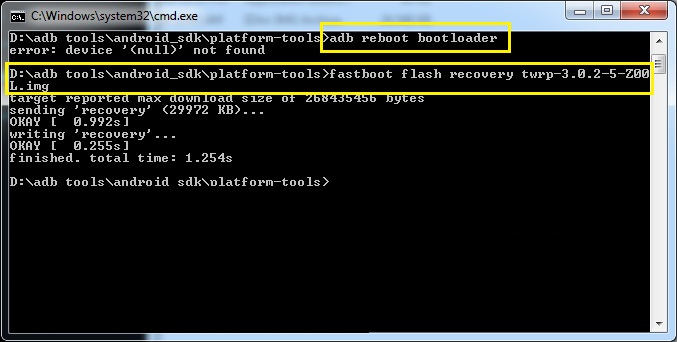
- adb reboot bootloader (hit enter key)
followed by
- fastboot flash recovery twrp-3.0.2-5-Z00L.img (hit enter key)
 |
| flash_twrp_via_adb |
3. No need to disconnect but simply boot into recovery Power+vol down or type in
- fastboot boot twrp-3.0.2-5-Z00L.img (hit enter key)
***If you wish to read on how to use adb sideload please refer to this post for reference.***
Installing SuperSU via adb sideload
***Download SuperSu.zip (here)
STEPS:
1. Make sure you have save the SU_zip file in adb platform tools, now once you are in recovery (TWRP) mode I want you to go to advanced and select ADB sideload, then "swipe to start sideload" as you may skip the wipe dalvik cache/wipe cache.
 |
| ADB_sideload_from_TWRP |
2. From your command window simply type
3. You will see from command window of the progress in percent then you are in the right track.
adb sideload (name of SU zip file).zip (hit enter key)
 |
| adb_sideload_SuperSu_zip |
5. Congrats! Simply reboot your system and check if you have root access via root check basic app.
For those who wish to try install SuperSU.zip via TWRP (INSTALL) then I wish you luck since I was not able to get good results but more of errors even tested one zip beta from shakalaca who tried to modify the zip file but ended up as corrupt file when using TWRP.
 |
| Marshmallow_root_access |
ERROR ENCOUNTERED IF USING TWRP TO FLASH SUPERSU.ZIP FILE
 |
| TWRP_flash_SuperSu_beta_fail |
Same result when I flashed chainfire original SuperSu.zip and return an error of zip file being corrupt until I decided to use adb sideload that successfully installed SuperSu. Not sure if there is a bug in Marshmallow firmware that won't let the TWRP install the SuperSu.zip file but in Lollipop version there are no errors.
There's an updated SuperSu zip file from chainfire archive if you wish to download instead of the above old zip file. (here)
Summary:
1. Download SuperSu zip file and move to adb platform tools folder (you may rename-optional)
2. Shift+Right click to open command window
3. Boot to recovery mode Power+Vol down and connect to PC
5. Wait as it installs the update to your device
6. Reboot your device
7. Download root checker to test
credits to chainfire SuperSu.zip
Until next post...Installing xposed framework for Asus Zenfone 2 Laser 5.5s 6.0.1 Marshmallow
Share with friends if you found this tutorial helpful.
Enjoy!
There's an updated SuperSu zip file from chainfire archive if you wish to download instead of the above old zip file. (here)
Summary:
Using TWRP recovery via adb sideload:
2. Shift+Right click to open command window
3. Boot to recovery mode Power+Vol down and connect to PC
- click advance
- select adb sideload
- wipe cache/wipe dalvik cache (optional)
- swipe to start sideload
5. Wait as it installs the update to your device
6. Reboot your device
7. Download root checker to test
credits to chainfire SuperSu.zip
Until next post...Installing xposed framework for Asus Zenfone 2 Laser 5.5s 6.0.1 Marshmallow
Share with friends if you found this tutorial helpful.
Enjoy!


No comments:
Post a Comment