After upgrading to the latest Marshmallow version, I have tested to find out a way to revert back to Lollipop version but ended up "bootlooped" instead, after trying to flash back TWRP via adb and restoring my backup zip files that was rooted before.
It does not end from Asus logo rather it can open up to the homepage but keeps on restarting back to Asus logo, so I did found a solution whenever you encounter such problem you can easily use ADB sideload.
Whatever problem you may have like stuck on logo, auto reboot etc this will be a good fix to your device and be back to normal as I tackle below on how to recover back your device from such errors.
At the end of this tutorial I will show you some scenarios that I tried but got some errors for your reference only.
Things Needed:
1. Android L firmware zip file (latest)=Version WW_1.17.40.1531
2. Stock boot.img and Stock recovery.img -(these are stock img from the latest Android L with version WW_1.17.40.1531)
3. ADB installed in PC
***click on boot.img and recovery.img above to download file***
STEPS:
1. Make sure to move the downloaded firmware Version WW_1.17.40.1531 inside adb platform tools folder as shown. You may rename it to update.zip or whatever name you like or save it as is.
 |
| save_zip_file_inside_adb_platform_tools |
2. Open a new command window Shift+right click mouse as new pop up cmd window will appear on your screen.
 |
| Shift+right click_to_open_command_window |
3. Now hold power button + volume down on your phone to go into recovery mode then connect to your computer then scroll using your volume down button and choose "apply update from ADB"
note: if you have custom recovery.img installed like TWRP best to flash first the stock recovery.img via adb else you will encounter errors later on, see command from next step.
4. From your command window simply type in the code:
adb sideload (name of zip file).zip
For this tutorial since we did not rename our file to a shorter one but just the whole name of the firmware then we must type as it is and don't forget to add .zip extension from the command.
adb sideload UL-Z00L-WW-1.17.40.1531-user.zip
 |
| adb_sideload_command |
5. From step above use the command "fastboot flash recovery recovery.img" if you are using a customized recovery like TWRP before typing in the code for "adb sideload" but if you are using your stock recovery then you may skip that part.
6. This is how it look like on your device, disregard the upper error on installation aborted since that error was caused when I was on custom recovery.img which is TWRP but after flashing the stock recovery.img it went smoothly after typing later the adb sideload command.
 |
| installing_update |
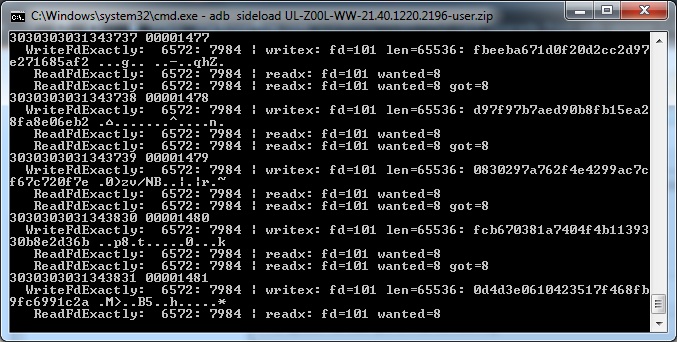
7. Wait as it will complete the process and you may read from your phone that it is trying to verify and will now install the update file, as long as you can see <~0%> going to <~100%> from your command line from your PC then you are doing fine.
 |
| adb_sideload_progress_status |
8. Congrats! Successful installing the zip via adb sideload
 |
| adb_sideload_complete |
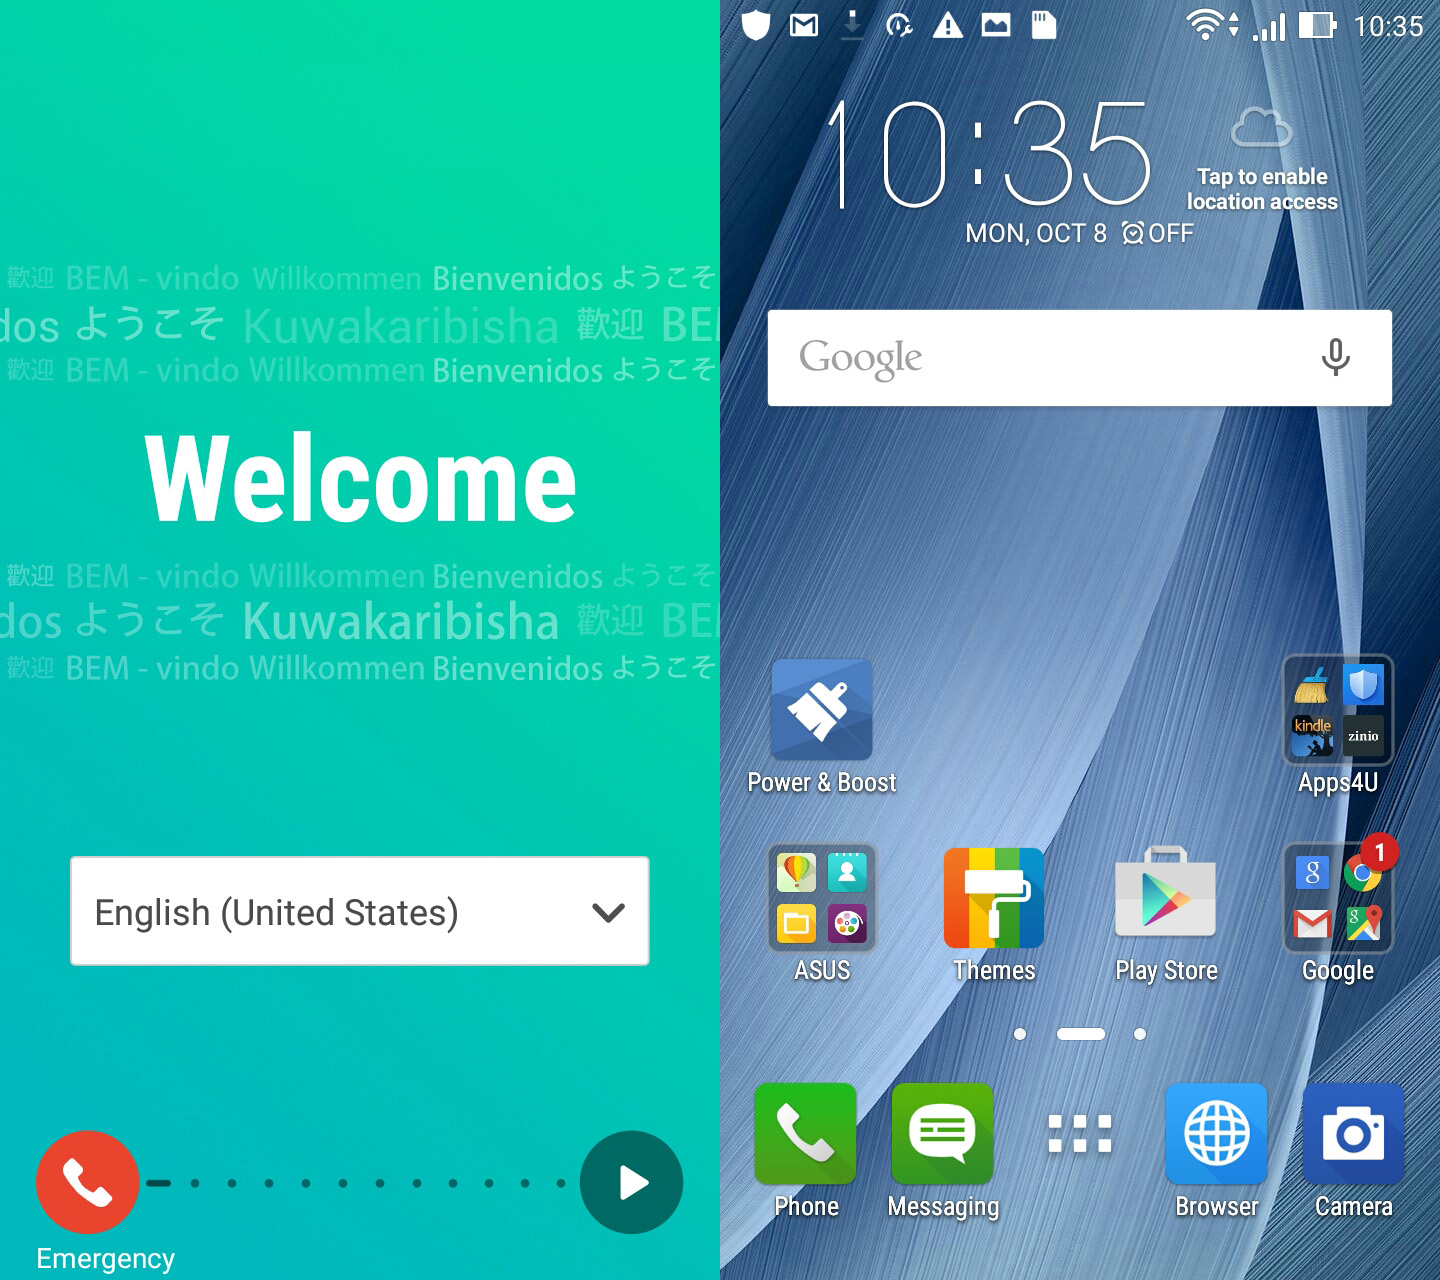
9. What you will see from your device and can select reboot system to restart your device.
 |
| install_complete |
10. After reboot you are ready to set up your device just like from a fresh firmware when you bought your device.
 |
| ready_for_set_up |
11. Checking from your system information to see what would be the version
 |
| system_information |
I can remember my stock version is the same as this one 20160428 which I thought what was posted from their download section of (2016/05/13) was different, now it seems those dates posted are just released dates after all.
12. Since I managed to download and saved the Marshmallow update.zip file from my internal storage it easily pop out from my notification status bar.
 |
| system_update_from_notification |
Summary:
1. Download firmware zip file and move to adb platform tools folder (you may rename-optional)
2. Shift+Right click to open command window
3. Boot to recovery mode Power+Vol down and connect to PC
- wipe data/factory reset, then select
- apply update from ADB
4. Type adb sideload (name of zip).zip and hit the enter key
5. Wait as it installs the update to your device
6. Reboot your device
~~end~~
TESTING OUT THE MARSHMALLOW VIA ADB SIDELOAD
To test coming from a recovered Lollipop version above I directly use adb sideload if it will work so same steps booting into recovery mode, wipe data/factory reset then apply update from ADB.
 |
| ota_zip_under_adb_platform_tools |
Typing adb sideload ota.zip from command window
 |
adb_sideload_ota.zip
|
 |
adb_sideload_ota.zip_progress
|
 |
| adb_sideload_ota.zip_complete |
Reboot system and wait for the homepage to load. Take note that it will take time before it opens up the home menu and will be stuck in your Asus logo for around 15-20minutes as if you are in a bootloop so be patient.
 |
home_menu_apps
|
 |
Android_M_apps_preinstalled
|
 |
| system_information |
Doing the wipe data/factory reset will delete files you saved from your internal storage as I mentioned earlier that I saved both the Lollipop and Marshmallow zip files from internal and once I check after the update simply erased both files.
Here are some errors when at first running adb sideload that you may encounter
Error 1:
"You need adb 1.0.32 or newer to sideload to this device"
Quick fix:
- Update your adb platform tools by going to your AVD manager
 |
| AVD_Manager |
Simply download the platform tools updated version and your good to go
 |
| Install_updated_version_platform_tools |
Error 2:
"Can't read XXX.zip file/Can't read adb sideload"
Quick fix:
- From your command window type the following codes:
adb kill-server (hit enter)
set ADB_TRACE=all (hit enter)
- Then try again typing adb sideload (name of zip file).zip and check if you get errors, also check your zip file is located on your adb platform tools folder a MUST.
Error 3:
If after typing the codes on Error 2 does not resolve the issue and still getting errors then let's try to use Large Address Aware.
Quick fix
- Download any of the two zip file below then run the exe inside those zip file and simply link your adb.exe click on the check box and save then type again the command "adb sideload (name of zip file).zip"
 |
| run_La_exe_inside_zip_file |
Download links:
la_01_link
la_02_link
credits: FordGT90Concept
Error 4:
If you see this from your command window then definitely this will not push through
 |
| adb_sideload_error |
Quick Fix
- Some suggest to use a different USB cable
- Still at TWRP recovery, try first going back to advanced select adb download and check both wipe dalvik/cache, do this two times if adb sideload will not push through after the first try.
- Last resort I suggest to flash both the stock boot.img and recovery.img via adb, simply hold power+vol up to boot into fastboot mode then connect to PC and flash, then boot into recovery Power+vol down, wipe data/factory reset, then scroll to apply update from adb then type the adb sideload command
 |
| flash_stock_img_via_adb |
Error 5
- I have tested using a custom recovery via TWRP to install and use the adb sideload feature but will result to errors like "Zip file is corrupt" when installing, and "Error 7 Please use the right SKU" usingg adb sideload as shown.
 |
| TWRP_install_zip_adb_sideload |
Quick Fix
- I made one last step before I flashed the stock recovery.img using my TWRP and that is swipe to factory reset twice.(Just be sure you made a back up of those necessary data stored in your internal storage before applying this one)
 |
| swipe_to_factory reset |
- Before you proceed on flashing the boot.img and recovery.img kindly retest by applying adb sideload directly with TWRP since I have tested installing another zip file with TWRP as my custom recovery and it went through. Just go to advanced select adb sideload and start sideload you may opt to check wipe cache and type adb sideload (name of zip file).zip from command window.
- Flash both the stock boot.img and recovery.img via adb, simply hold power+vol up to boot into fastboot mode then connect to PC and flash, then boot into (stock) recovery, scroll to apply update from adb then type the adb sideload command
|
| flash_stock_img_via_adb |
Sometimes the wipe data/factory reset from your recovery mode either (stock recovery or TWRP recovery) seems to solve those errors which you may include from your steps but again make sure you had a back up of those important data saved from your internal storage else they will be erased.
Hope this helps and if you can recall from my other post on how to upgrade from (L) to (M) version from a rooted phone but you need first to flash the stock boot and recovery.img in order for the device to permit the upgrade process.
Until next post...How to root your Asus Zenfone 2 Laser 5.5s 6.0.1 Marshmallow (here)
Share with friends if you found this tutorial helpful.
Enjoy!


No comments:
Post a Comment